Painting a Twisted Old Tree

Art, Trees, watercolor tutorials

Trees are one of my favorite subjects in general; so, I can’t think of a better watercolor subject than a large gnarly tree, taking center stage. Down at the end of our driveway stands a large Weeping Willow. It is the stuff of fairytales. Vines have now made a home on it too, adding even more character to this old being. My neighbor would not be so quick to romanticize this tree, as I have. We tend to see nature differently. 

Twisted Old Tree. Watercolor on Arches Rough Paper

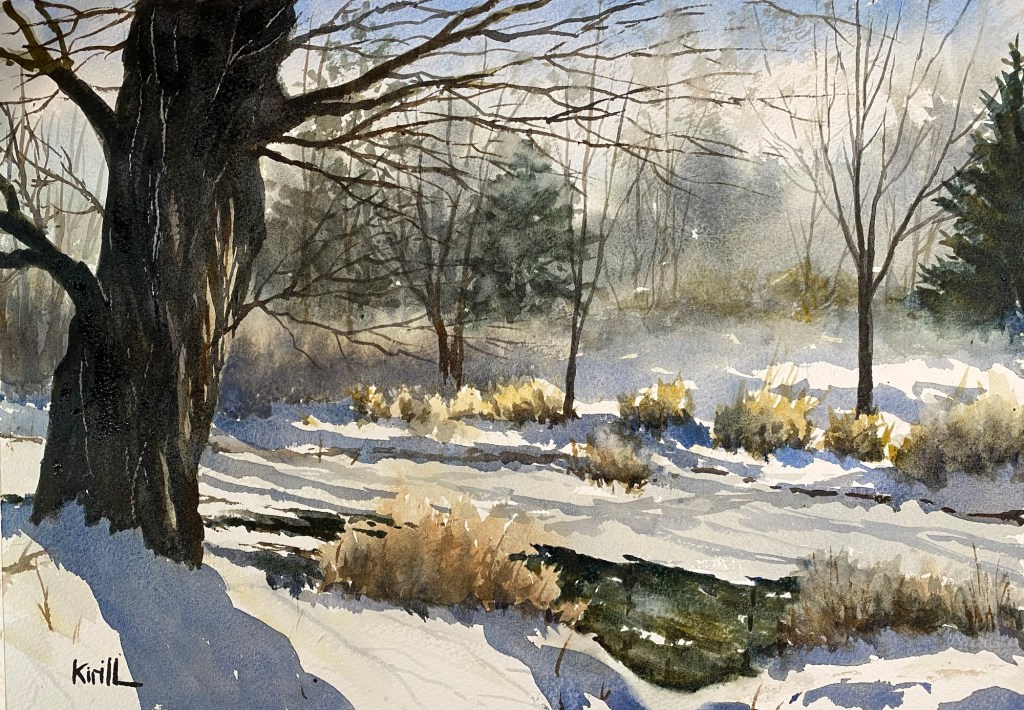
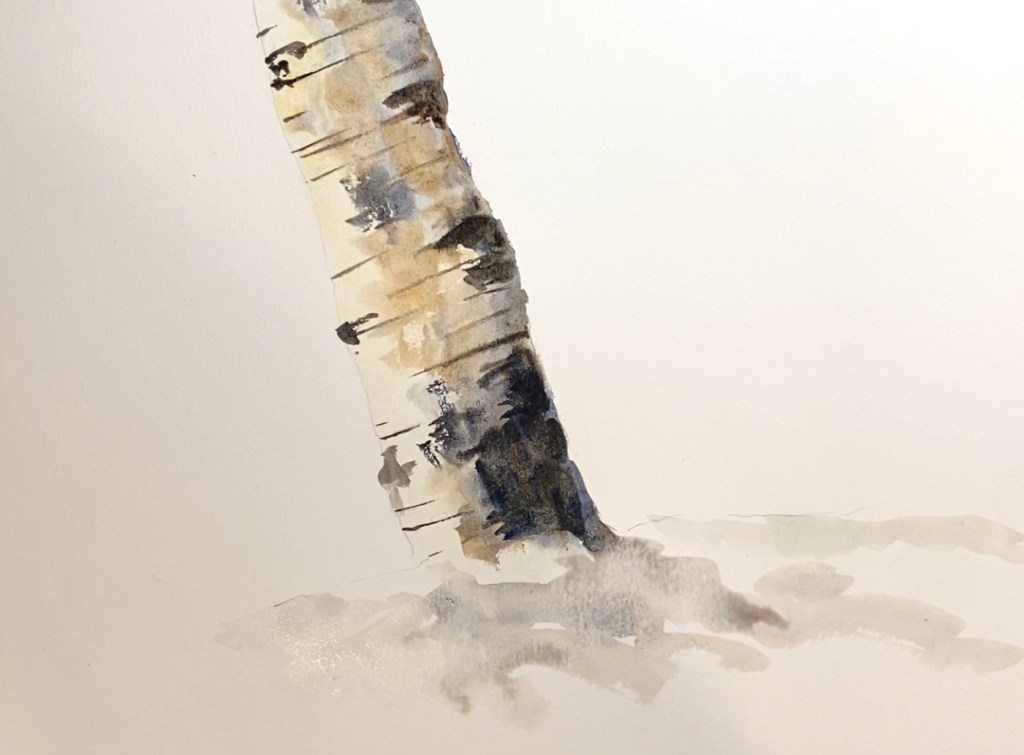
If anything, this old Weeping Willow made a fine live model for this watercolor tutorial! Wouldn’t you agree? And, as if this tree isn’t already dramatic on its own; in this painting, I attempt to enhance its presence further by painting it in a near-silhouette, keeping a bit of sunlight on the right side of the trunk, which is reflected by the snow. This allows the viewer’s eyes to feast on the details of the bark – ridges, fissures, holes, and so forth, instead of viewing just a dark form. The shadows on the snow create additional interest and the diffused background; hopefully, incites the viewer to complete the painting in their mind. 

If you decide to follow the tutorial and paint this scene on your own – just remember, there’s no need for details early in the painting. In fact, as an initial wash – the entire tree can be painted in just one (light) tone, some of which, you might decide to leave on the paper when you are finished painting. Move loosely and freely on the paper, as you add water and pigment. This is something I (and most people) struggle with due to a desire for perfection. Save the details for last and good luck!

The Easiest Type of Watercolor- A Silhouette

Art, watercolor tutorials

I believe the easiest way to achieve an almost photo-realistic effect in watercolor is to paint a silhouetted landscape! The reason it is less challenging is because there are less problems to solve when it comes to defining values. In a silhouette painting, there are only 2 main values – light and dark. In contrast, when we paint a still life or a painting which takes place during the day with the light coming from a certain direction, there are usually many more values, in addition to only the lightest and darkest areas. Therefore, with a silhouette painting – there is a lot less room for error. 

Silhouette Landscape (watercolor) Inspired by Ferdinand Petrie

I’m not saying that there isn’t a certain degree of difficulty in a silhouette painting. There will be challenges, such as –

1)      Achieving a dark enough value. 

In watercolor, when we initially put down color – it will always dry lighter than when we first applied it. So, the challenge will be in adding additional washes of darker color to finally achieve a dark enough value without creates blossoms or blotches. This will require allowing enough time for the previous washes to dry, as well as bringing in enough color while balancing the color: water ratio.     

2)      Use Complementary Colors.

This goes back to color theory; the colors that work best in a silhouette painting are complementary colors. These colors are opposite each other on the color wheel, and when paired together – they create high contrast.

3)      Painting believable shapes.

With enough drawing practice, the artist will be able to draw (and paint) realistic shapes, such as fence posts or something a bit more fun like a wild-looking bush or tree, without having to worry much about details other than simply filling in that shape with the darkest value.


I’ve created a demonstration (YouTube) link below on this subject. I hope you find this tutorial useful and feel free to send me comments and questions. Thank you.

Don’t Go Chasing Waterfalls – in Watercolor

Art, Outdoor Adventure, watercolor, watercolor tutorials

Capturing the movement of a waterfall in watercolor can be quite a chase. In this video tutorial, the waterfall is relatively small compared to some of the ones I’ve seen. Therefore, there is seemingly less work involved in painting the actual waterfall, but most of the work is going to be getting the values right between the darker boulders framing the lighter waterfall, without making the scene too flat. 

In the reference photo above, there is quite a bit going on – rocks, sticks, logs, water, trees, and more rocks. It can be easy to get lost in all the details. The challenge will be to combine all the smaller objects into bigger objects when painting this scene. A value study would surely come in handy here, but I’ve impatiently jumped right into the main painting. How will the painting turn out? Tune in to find out via the link below!

How to Paint Clouds in Watercolor – A Beginner’s Tutorial

Art, watercolor tutorials

Many people consider watercolor an unforgiving medium. It can be difficult to control, due to factors, such as, skill level or even the temperature and humidity levels that day. So, painting the sky in watercolor may feel intimidating. It felt that way to me, anyway. I still have nightmares about that dreaded “cauliflower” effect, which can happen when there’s too much water, causing your paint to sort of blossom into a cauliflower shape; distorting whatever you intended to paint in the first place. 

Clouds in Watercolor

But, with a little practice, working with watercolor tends to get easier and easier as we begin to get a handle on a good ratio of water to color (more on that in a future post). In addition to balance between water and color, it is important to keep the brush moving across the paper without spending too much time in one spot! One of the most common watercolor mistakes is “overbrushing” – the act of going back into the same spot multiple times with more paint and/or water. I still do this from time to time, no matter how many times I tell myself to move on. I suppose we go back to the same spot to try to improve it, but we are probably better off just taking one shot at it and letting the watercolor magic happen on its own. Who knows, we may end up with a “happy accident”.  

However, there are times when just one pass at the whole thing leaves the painting flat and lacking values between lights and darks. If done carefully and skillfully, watercolor paintings can be enhanced or corrected by going back into some areas (while leaving other areas untouched) with a darker color or by softening hard edges with clean water. For example, when painting clouds, we do not want to end up with a hard line between a cloud and the sky color because clouds tend to have a soft, puffy, and almost fuzzy feel to them.  In the following video tutorial, I’ll cover the basics of painting clouds in watercolor. I hope you find this demonstration helpful!

How to Paint Birch Tree Bark in Watercolor

Art, native plants, Trees, watercolor, watercolor tutorials

Birch trees have a wonderfully unique bark, and depending on the species of birch – this unique bark has a wide range of color and texture. For example, River birch (Betula nigra) may have brown, gold, white, and even reddish hues. This type of bark flakes off in large chunks as the tree grows older. In contrast, Paper Birch (Betula papyrifera) – the type of birch tree featured in this post, has mostly smooth white bark, but there are subtle browns, as well as, dark colored blotchy spots and horizontal lenticels.

Paper Birch – Watercolor Study

What are lentilcels? I’ll explain in the video below. This tutorial covers easy techniques for painting one of the most interesting tree bark – birch tree bark!